Top 10 eSIM Activation Mistakes Travelers Make (And How to Avoid Them) in 2026

TL;DR: Travelers waste money and experience connectivity failures due to ten common eSIM activation mistakes including purchasing plans too early, ignoring device compatibility, forgetting to enable data roaming, deleting QR codes prematurely, and selecting wrong network operators. This guide provides specific solutions for avoiding these errors across popular destinations like Turkey, Saudi Arabia, and Indonesia, ensuring seamless connectivity from the moment you land.
Global eSIM adoption has skyrocketed to 487 million users in 2026, yet support teams still report that 34% of travelers encounter activation issues during their first eSIM experience. These problems aren’t caused by technology failures but rather by preventable user errors that stem from misunderstanding how eSIM technology differs from traditional physical SIM cards. Understanding these common mistakes before your trip saves hours of frustration and keeps you connected when you need it most.
1. Buying Your eSIM Plan Too Early Before Departure
Many travelers purchase eSIM plans weeks or months before their trips, assuming early preparation is always beneficial. However, most eSIM plans activate the moment you scan the QR code or when your device first connects to the destination network, immediately starting your validity countdown regardless of whether you’ve reached your destination.
The Right Approach:
Purchase your eSIM plan 24-48 hours before departure for optimal timing. This window gives you enough preparation time to complete installation and troubleshooting while ensuring your plan doesn’t start counting down days before you arrive. For destinations like Turkey eSIM coverage, buying two days before your Istanbul or Antalya flight means your 7-day plan doesn’t waste valuable days while you’re still at home.
Read activation terms carefully as providers handle timing differently. Some plans like Mobimatter’s regional options activate only when you land and your device connects to local networks, while others begin countdown immediately upon QR code scanning. Verify specific activation triggers before purchase to avoid losing paid days.
Timing Best Practices by Trip Type:
- Weekend trips (2-3 days): Purchase 24 hours before departure
- Week-long vacations (5-10 days): Purchase 36-48 hours before flight
- Extended stays (2+ weeks): Purchase 48 hours before, consider purchasing additional data as needed rather than long-validity plans
- Multi-country trips: Purchase regional plans 48 hours before first destination arrival
Set calendar reminders for eSIM purchase rather than buying impulsively during initial trip planning phases. This prevents the frustration of watching your 7-day plan expire while you’re still sitting in your home country counting down to departure day.
2. Skipping Device Compatibility Verification Before Purchase
Travelers frequently purchase eSIM plans without confirming their specific phone model supports eSIM technology, discovering incompatibility only after payment when attempting activation. Not all recent smartphones include eSIM capability, and regional variations mean the same model sold in different countries may have different eSIM support.
How to Verify Compatibility:
Check your device settings before any eSIM purchase. On iPhones, navigate to Settings > Cellular > Add eSIM. If this option appears, your device supports eSIM technology. For Android devices, go to Settings > Network & Internet > SIMs > Add SIM, and look for options mentioning “Download a SIM instead” or “Add eSIM.”
Be aware of model-specific limitations. iPhone XR, XS, and XS Max support only one eSIM profile. iPhone 11 and newer models support multiple eSIM profiles though only two lines (one physical SIM plus one eSIM, or two eSIMs) can be active simultaneously. Some Android manufacturers like Samsung started eSIM support with Galaxy S20 series, while budget Android phones often lack eSIM capabilities entirely.
Compatible Device Categories:
- iPhones: XS, XS Max, XR and all newer models (check regional variations)
- Samsung Galaxy: S20, S21, S22, S23, S24 series, Z Fold/Flip 3 and newer
- Google Pixel: 3, 3a, 4, 5, 6, 7, 8 series and newer
- Other brands: Verify specific model compatibility as availability varies widely
Regional device variations create confusion. An iPhone 14 purchased in China lacks eSIM support despite international versions including this feature. Always verify your specific device variant rather than assuming compatibility based on model name alone.
Research destination-specific network compatibility separately from eSIM capability. Your device may support eSIM technology but lack the radio bands needed for optimal performance in certain countries. Verify both eSIM capability and network band compatibility before international travel.
3. Forgetting to Enable Data Roaming on Your eSIM Line
This represents the single most common activation complaint support teams encounter. Travelers successfully install their eSIM, arrive at their destination, and panic when they see no data connection despite having purchased and activated a plan. The issue isn’t plan activation but rather disabled data roaming settings on the eSIM line.
Step-by-Step Resolution:
After installing your eSIM profile, you must explicitly enable data roaming for that specific line. On iPhones with multiple lines active, go to Settings > Cellular > [Your eSIM Name] > Data Roaming and toggle it ON. This feels counterintuitive because “roaming” typically means expensive charges, but for eSIM plans, data roaming must be enabled to connect to local networks.
Android configuration varies by manufacturer but generally follows this path: Settings > Network & Internet > SIMs > [Select your eSIM] > Roaming > Enable. Some Android interfaces label this “International Data Roaming” or simply “Mobile Data” under the specific SIM profile.
Common Settings Checklist Before Landing:
- Data roaming enabled specifically on eSIM line (not just globally)
- eSIM line set as default data line if you want it prioritized
- Original carrier line’s data roaming disabled to prevent accidental charges
- Automatic network selection enabled (manual selection causes connection issues)
- Airplane mode toggled off after landing to trigger network connection
Create a pre-flight checklist on your phone’s notes app with these settings steps. Review and verify all settings before takeoff so you’re not troubleshooting configuration issues while standing in arrival halls without connectivity.
Many travelers with eSIM Saudi Arabia plans for Riyadh or Jeddah trips report connectivity issues that resolve immediately once they enable data roaming on the correct line. This simple toggle switch causes 40% of all “eSIM not working” support tickets despite being a 10-second fix.

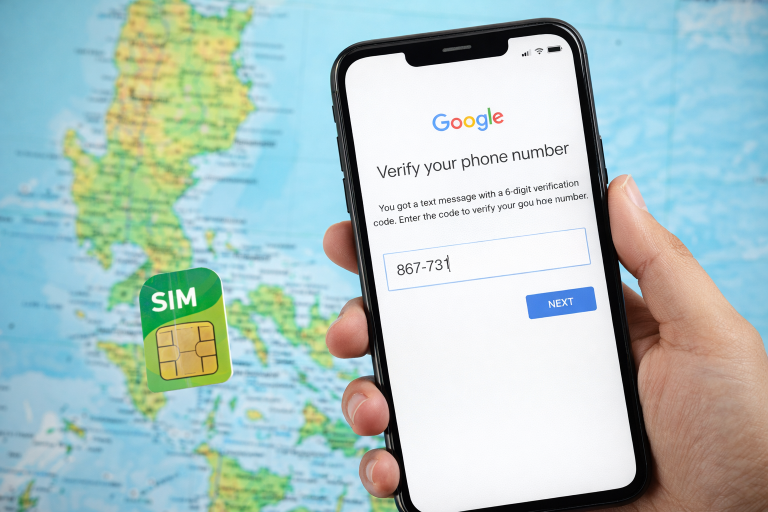
4. Deleting Your QR Code or eSIM Email Immediately After Installation
Travelers frequently delete confirmation emails or QR code screenshots after successful eSIM installation, assuming they’ll never need this information again. However, various scenarios require re-accessing your original eSIM activation credentials, and without the QR code or activation details, you may need to purchase a completely new plan.
Why You Need to Keep QR Codes:
Factory resets, phone replacements, accidental eSIM profile deletion, and iOS updates occasionally require reinstalling your eSIM profile. The original QR code is the only method to reinstall the same eSIM plan. Most providers including Mobimatter issue single-use QR codes, meaning you cannot regenerate the same code after initial installation.
Phone theft or loss during travel creates urgent connectivity needs. If you’ve saved your QR code to cloud storage or separate email folders, you can reinstall your eSIM on a replacement device immediately rather than purchasing new plans while managing the stress of device replacement abroad.
QR Code Storage Best Practices:
- Forward eSIM confirmation email to secondary email account before travel
- Screenshot QR code and save to cloud storage (Google Photos, iCloud, Dropbox)
- Save QR code image in password manager with travel documents
- Print physical QR code copy stored with travel insurance documents
- Create dedicated “Travel eSIM” folder in email to prevent accidental deletion
Never rely solely on your device’s local storage for QR code access. Screenshots stored only on your phone become inaccessible precisely when you most need them after device loss or failure. Cloud backup ensures you can access activation credentials from any internet-connected device anywhere in the world.
Set email filters that automatically label eSIM confirmation emails and exempt them from automatic deletion. Gmail and Outlook both support rules that prevent specific sender emails from ever reaching trash folders.
5. Installing Multiple eSIM Profiles Without Removing Old Unused Plans
Frequent travelers accumulate numerous eSIM profiles from different providers and destinations, eventually reaching device storage limits that prevent installing new profiles. Both iPhones and Android devices limit total stored eSIM profiles, and many travelers don’t realize unused profiles consume this limited space even when not active.
Profile Management Protocol:
iPhones store up to eight eSIM profiles but only allow two active lines simultaneously (or one eSIM plus one physical SIM). Once you’ve stored eight profiles, you must delete old ones before adding new plans. Android limitations vary by manufacturer with Samsung devices typically supporting five to ten stored profiles.
Review stored eSIM profiles regularly and delete expired or unused plans. On iPhone, navigate to Settings > Cellular, scroll to “SIMs” section, tap unused eSIM profiles, and select “Delete eSIM.” This removes the profile from storage without affecting your primary number or other active plans.
When to Delete vs. Keep Profiles:
- Delete: Single-use vacation plans after returning home
- Delete: Expired promotional trials from eSIM providers
- Keep: Your primary carrier’s eSIM if you use it regularly
- Keep: Regional plans you’ll reuse during frequent travel to same areas
- Delete: Duplicate profiles from testing different providers
Before installing new eSIM plans for upcoming trips, perform profile cleanup. This prevents installation failures caused by storage limits, which often manifest as vague error messages that don’t clearly indicate the underlying cause.
Label each eSIM profile clearly during installation using descriptive names like “Turkey-Jan2026” or “Indonesia-Bali-Feb” rather than default provider names. This makes identifying and deleting old profiles much easier months later when you’ve forgotten which profile corresponds to which trip.
6. Selecting Manual Network Instead of Automatic Network Selection
Network selection settings dramatically impact eSIM connectivity but few travelers understand this configuration option. Manual network selection locks your device to a specific carrier, while automatic selection allows your phone to choose the strongest available network from all carriers your eSIM supports.
Optimal Network Configuration:
Always use automatic network selection unless you have specific technical reasons requiring manual carrier choice. Your eSIM plan typically includes multiple network partners in each destination, and automatic selection ensures your device connects to whichever provides strongest signal at your current location.
Travelers in Indonesia particularly benefit from automatic selection given the country’s archipelago geography. Your eSIM Indonesia plan may partner with Telkomsel, XL Axiata, and Indosat networks. Automatic selection lets your device switch between these providers as you move between Bali, Jakarta, and other islands, maintaining optimal connectivity throughout your trip.
Network Selection Settings Path:
- iPhone: Settings > Cellular > [eSIM Line] > Network Selection > Enable Automatic
- Samsung: Settings > Connections > Mobile Networks > Network Operators > Select Automatically
- Google Pixel: Settings > Network & Internet > SIMs > [eSIM] > Automatically Select Network
Manual network selection makes sense only for troubleshooting specific connectivity issues. If automatic selection repeatedly connects you to weak networks despite stronger alternatives available, temporarily switch to manual mode, test each available carrier, identify the best performer, and lock to that network.
7. Not Testing eSIM Connectivity Before Leaving Airport WiFi Coverage
Many travelers assume their eSIM works perfectly after seeing “LTE” or “5G” indicator appear in status bar, only to discover connection problems hours later when they’re far from airport WiFi and desperately need working data. This mistake leaves you troubleshooting configuration issues without reference materials or support access.
Airport Connectivity Testing Protocol:
Before leaving airport terminal, deliberately disconnect from airport WiFi and verify your eSIM provides working internet connectivity. Open a web browser and load multiple different websites to confirm DNS and data routing function properly. Test both Safari/Chrome for web access and several apps including WhatsApp, Google Maps, and email.
Perform actual speed tests rather than assuming connection quality from signal bars. Weak network selection or configuration issues may show full signal bars but deliver unusable speeds. Run Speedtest.net or Fast.com checks confirming you’re getting reasonable bandwidth for 4G or 5G connection.
Complete Airport Testing Checklist:
- Disable airport WiFi completely in phone settings
- Verify eSIM shows as active data line with LTE/4G/5G indicator
- Open web browser and successfully load three different websites
- Send test WhatsApp message to contact back home
- Load Google Maps and verify your current location appears correctly
- Check email synchronization downloads recent messages
- Run speed test confirming 5+ Mbps download (minimum usable speed)
- Screenshot speed test results for reference if issues arise later
If any test fails, reconnect to airport WiFi and troubleshoot immediately while you have internet access to search solutions or contact support. Common issues include incorrect data roaming settings, wrong network selection, or APN configuration problems that you can resolve quickly with WiFi access.
Airport terminals provide ideal troubleshooting environments with seating, power outlets, and free WiFi backup. Once you’ve traveled to your hotel or accommodation, connectivity problems become exponentially more frustrating to resolve without these resources readily available.

8. Ignoring eSIM Plan Data Limit Warnings and Speed Throttling
Most eSIM plans include specific data allowances with varying policies for exceeding limits. Some providers completely cut service after you exhaust data quotas, others throttle speeds to unusable levels, while some allow continued use at premium per-MB rates. Ignoring these limits leads to unexpected service interruptions or surprise charges.
Data Management Strategies:
Enable data usage tracking on your device before travel. iPhones allow setting data limits under Settings > Cellular > Cellular Data. Configure warnings at 75% and 90% of your plan allowance so you receive alerts before complete exhaustion. Android devices offer similar tracking under Settings > Network & Internet > Data Usage.
Understand your specific plan’s overage policy before purchase. Mobimatter’s plans clearly specify whether data continues at reduced speeds, stops completely, or charges overage fees. Budget-conscious travelers should choose plans with generous data buffers above expected usage rather than minimum viable options.
Data Conservation Techniques for Travelers:
- Download offline maps before daily exploration (saves 50-100MB daily)
- Disable automatic app updates while traveling
- Use WiFi at accommodations for large downloads and video streaming
- Enable “low data mode” on iPhone or “data saver” on Android
- Limit social media app background refresh to reduce passive consumption
- Compress images before uploading to social platforms
Monitor daily usage patterns during first 24 hours of your trip to establish baseline consumption rates. If you’re using 1GB daily but only purchased a 3GB weekly plan, immediately purchase additional data or modify usage habits rather than waiting until exhaustion creates emergencies.
Many tourist activities consume more data than travelers anticipate. Video calls home, constant GPS navigation, uploading high-resolution photos to cloud storage, and streaming music all drain data quotas quickly. Budget data allocation realistically based on your actual travel behavior rather than optimistic minimal estimates.
9. Keeping Physical SIM Card Active for Data During eSIM Use
Travelers often maintain their home carrier’s physical SIM card active alongside their travel eSIM, intending to use the eSIM for data while keeping their primary number available for calls. However, improper configuration causes devices to route data through the expensive home carrier instead of the eSIM, resulting in massive international roaming charges.
Dual SIM Configuration:
When using eSIM for travel data, explicitly designate it as your default data line. On iPhone, go to Settings > Cellular > Cellular Data and select your eSIM profile. This ensures all data traffic routes through your travel plan rather than your home carrier despite both lines being active.
Disable data roaming entirely on your physical SIM home carrier line. Navigate to Settings > Cellular > [Your Home Carrier] > Data Roaming and toggle OFF. This prevents any accidental data usage through your primary carrier even if device configuration somehow defaults to wrong line.
Optimal Dual-SIM Travel Configuration:
- Home carrier physical SIM: Active for calls/SMS, data roaming disabled
- Travel eSIM: Active for data only, data roaming enabled
- Default data line: Explicitly set to travel eSIM
- Calls/SMS default: Can remain on home carrier number
- iMessage/FaceTime: Verify these use eSIM data, not home carrier
This configuration allows you to receive calls and texts on your regular number (potentially at per-minute/message roaming rates depending on your plan) while all internet data routes through your affordable eSIM plan. Family and work contacts reach you at your normal number without learning temporary travel numbers.
Airplane mode provides an alternative approach for travelers who don’t need their home number accessible during travel. Enable airplane mode, then manually re-enable WiFi and cellular data. This connects only your eSIM line while completely disabling the physical SIM, eliminating any possibility of accidental roaming charges.
10. Not Saving eSIM Provider Support Contact Information Before Travel
The final critical mistake travelers make is failing to save eSIM provider support contact details before departure. When connectivity issues arise, you need support access but can’t reach the provider without working internet to search their website or access email confirmations containing support information.
Pre-Travel Support Preparation:
Screenshot your eSIM provider’s support page including email addresses, WhatsApp numbers, live chat URLs, and support hours before leaving home. Save these images locally on your device where they remain accessible without data connection. Include this information in your phone’s contacts app with entries like “Mobimatter Support” containing all relevant contact methods.
Identify which support channels work without cellular data. Email requires connectivity you may not have during outages. WhatsApp requires initial internet for message sending. Phone numbers provide the most reliable support access during connectivity emergencies if your provider offers voice support lines.
Essential Pre-Travel Support Documentation:
- Screenshot provider’s support page with all contact methods
- Save support email address in contacts with “eSIM Emergency” label
- Note support hours adjusted to your destination timezone
- Bookmark provider’s FAQ page for offline reference
- Save common troubleshooting steps as phone notes
- Record your eSIM plan details (order number, activation date, data allowance)
Test support contact methods before departure. Send a non-urgent test message via your provider’s preferred support channel confirming response times and process. This familiarizes you with support procedures during low-stress situations rather than discovering processes mid-emergency abroad.
Research backup connectivity options available at your destination. Tourist information centers, hotel business centers, and international chain restaurants typically offer free WiFi that provides emergency internet access if your eSIM fails completely. Knowing these alternatives in advance prevents panic during connectivity outages when you need to contact support or research solutions.
By avoiding these ten common mistakes, travelers ensure smooth eSIM activation and reliable connectivity throughout their trips. The key is preparation before departure: verifying compatibility, understanding your specific device configuration requirements, properly configuring dual-SIM setups, and saving crucial support information for quick access during any issues that arise. Taking 30 minutes before your trip to review these areas prevents hours of frustration abroad.
Frequently Asked Questions
Can I install my eSIM before leaving home or should I wait until I arrive?
You can and should install your eSIM profile before departure, but installation and activation are separate processes. Install the profile at home, verify it appears in your device settings, but ensure data roaming remains disabled until you land at your destination. This home installation lets you troubleshoot any technical issues while you still have reliable internet access, but the plan typically only activates and begins counting down when you arrive and enable data roaming at your destination.
What happens if I accidentally delete my eSIM profile during my trip?
If you saved your original QR code following recommendation in mistake #4, you can reinstall the same eSIM profile immediately without purchasing a new plan. However, if you didn’t save the QR code, most providers including Mobimatter cannot regenerate the same code, requiring you to purchase an entirely new plan. This makes QR code backup one of the most critical preparation steps before any international travel with eSIM connectivity.
Do all eSIM plans work the same way across different phone brands?
The core eSIM technology functions identically across iPhone and Android devices, but configuration interfaces and settings locations vary significantly by manufacturer. iPhones offer the most consistent experience across models, while Android devices differ substantially between Samsung, Google Pixel, and other brands. Always verify specific settings paths for your exact device model and manufacturer rather than following generic instructions that may not match your interface.
How much data do travelers typically need for a one-week international trip?
Data requirements vary dramatically based on usage patterns. Light users who primarily use WiFi at accommodations need only 1-3GB weekly for occasional maps and messaging. Moderate users actively navigating cities, uploading photos, and checking email throughout days typically consume 5-10GB weekly. Heavy users working remotely, video calling, or streaming content require 15-30GB or more. Monitor your typical home data usage for a week to establish baseline expectations before traveling.
Can I use the same eSIM plan for multiple countries in one trip?
This depends entirely on whether you purchased single-country or regional eSIM plans. Single-country plans like Turkey-only options work exclusively in that destination. Regional plans covering multiple countries allow seamless connectivity as you cross borders without switching plans or reconfiguring settings. Always verify coverage areas before purchase if your itinerary includes multiple countries, and choose regional plans when traveling across several destinations to avoid managing multiple separate eSIM profiles.